
CharacterParts.md 4.4KB
Swapping individual Sprites
You can use Sprite Swap to change only one Sprite on the actor without affecting the other Sprites. This allows you to alter part of an actor’s visuals (for example, changing its clothes or skin to a different color) while keeping the rest of the visuals the same.
In the following example, there are two Sprites that are variations of the actor’s scarf, with one being green and the other being blue. This workflow demonstrates how to switch from one to the other in the same actor:
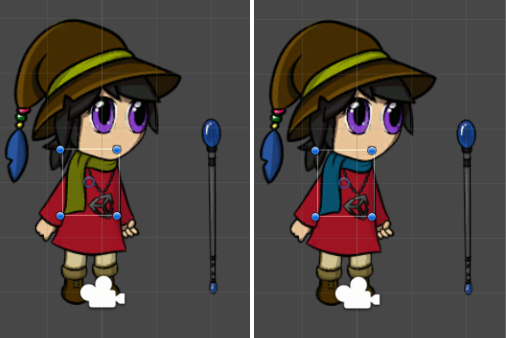
Left: The original green scarf Sprite. Right: An alternate blue scarf Sprite.
- Place the Sprites for both scarves into the same Sprite Library Asset, and add them both to the same Category (named
Scarf). - Give each of the Sprites a unique Label name (in this case
green scarfandblue scarfrespectively).
- In the Scene, select the Instantiated Prefab and then select the
ScarfGameObject the Hierarchy window. - Go to the Sprite Resolver component of the
ScarfGameObject. The Sprite Resolver‘s visual selector displays the two Sprites available in theScarfCategory.
- Select the
blue scarfto switch the Sprite rendered by theScarfGameObject to it instead.
The Sprite Resolver’s Label is set toblue scarf.
If you want to switch more than one Sprite at a time, consider swapping the Sprite Library Asset to switch to an entire alternate set of Sprites.
Sprites pivot alignment
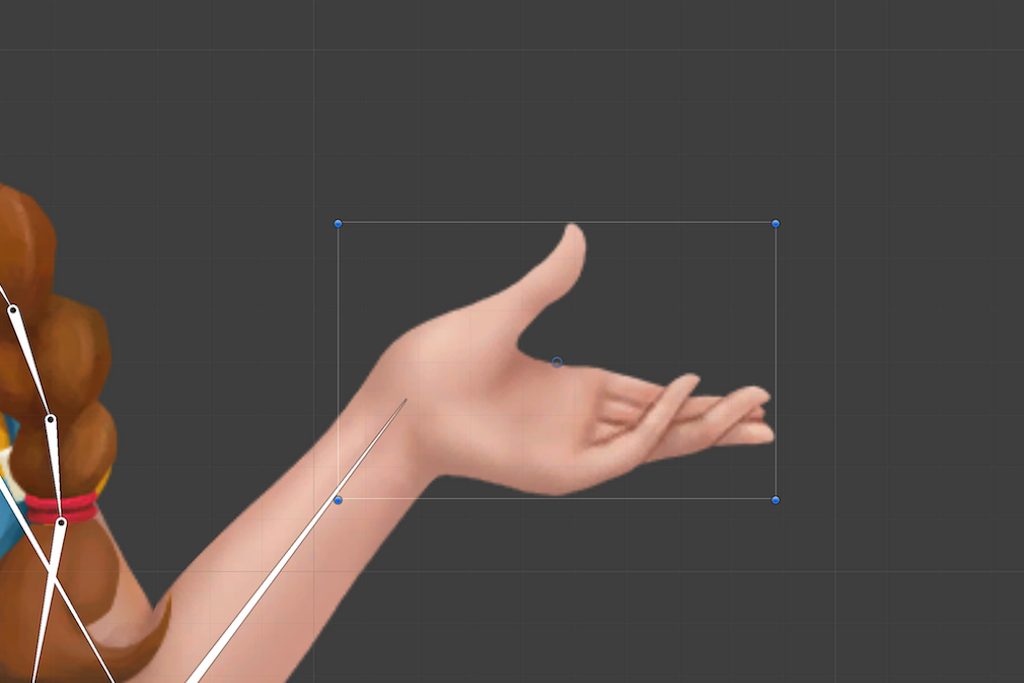
When working with skinned Sprites, the positions of their Meshes’ vertices are calculated based on the current skeleton pose, and are unaffected by each Sprite’s individual pivot. However, when swapping Sprites which are not skinned (that is not Rigged to an actor’s skeleton), then they may not align correctly as their pivots are not in the same relative positions. This is especially noticeable if the Sprites are of very different sizes. The following example shows how Sprites can misalign when a skinned Sprite is swapped with an unskinned one:
 |
 |
|---|---|
Figure 1: The original open hand Sprite. |
Figure 2: Swapping to the thumbs up Sprite. |
In this example, the GameObject containing the Sprite and the Sprite Swap component are aligned to match the open hand Sprite in the Skinning Editor. As the thumbs up Sprite is not rigged to the same skeleton, it appears misaligned as its pivot location is not in the same relative position as the original Sprite. To align the unskinned thumbs up Sprite, it is necessary to adjust it’s pivot to match the relative position of the open hand Sprite’s pivot.
Note: If a Sprite is rigged to a skeleton, then its individual pivot location is overridden by the influence and position of the bone it is weighted to .
To change the pivot position of a Sprite, first select the Sprite in the Sprite Editor, which causes the Sprite panel to appear at the bottom right of the Sprite Editor window. The Sprite panel shows details of the selected Sprite, such as its Name, Position, and Pivot properties. You can select from a dropdown list of predefined pivot options from the Pivot menu. These include options such as Center and Top Left, as well as Custom Pivot (this unlocks the Custom Pivot position property settings, allowing you to input your own custom position for the pivot).
In this example, the two swapped Sprites are aligned by changing the Pivot property from Center to Custom Position, and inputting the Custom Pivot position that aligns the thumbs up Sprite with the open hand Sprite.
![]()
![]()
After applying the changes, the swapped Sprite is now aligned with the rest of the actor after the Sprite Swap.
